martedì 27 maggio 2008

How to overcome the 4,095 MB paging file size limit in Windows

Article ID: 237740 Last Review: October 26, 2007 Revision: 6.7

SUMMARY

When you set the paging file size in Windows, the documentation states that the largest paging file that you can select is 4,095 megabytes (MB). This limit is imposed by the page mapping that we use on x86 processors. These processors cannot handle more pages per page file. This is the limit set per volume; you can actually create paging files this large on one or more drives if you need a larger paging file. If extra drives or volumes are not available, you can create multiple paging files on a single drive by placing them in separate folders.

However, you can create a single page file that is more than 4,095 MB on a Microsoft Windows Server 2003 Service Pack 1 (SP1)-based computer.

Notes To create a larger page file, you must load the Physical Address Extension (PAE) kernel. In Windows

Server 2003, PAE is automatically enabled when the server is using Hot Add Memory devices. Alternatively, you can force the PAE kernel by adding the /PAE switch in the Boot.ini file.
To get a complete memory dump from computers that have 4 GB RAM or more, it is still necessary to use the /MAXMEM switch in the Boot.ini file. One of the page files on the system partition must still be 1 MB larger than the amount of RAM installed in the computer to successfully create a memory dump. For more information, click the following article number to view the article in the Microsoft Knowledge Base:

108393 (http://support.microsoft.com/kb/108393/) The /maxmem switch in the Windows Boot.ini file

MORE INFORMATION

Important This section, method, or task contains steps that tell you how to modify the registry. However, serious problems might occur if you modify the registry incorrectly. Therefore, make sure that you follow these steps carefully. For added protection, back up the registry before you modify it. Then, you can restore the registry if a problem occurs. For more information about how to back up and restore the registry, click the following article number to view the article in the Microsoft Knowledge Base:

322756 (http://support.microsoft.com/kb/322756/) How to back up and restore the registry in Windows

Note that reading or writing a paging file of this size can be costly in terms of performance. If you find that you need a paging file of this size, it may be better to add more RAM to the computer. The current algorithm Windows uses to set the default paging file size is:

•If total physical RAM is less than 2 gigabytes (GB), the paging file is set to 1.5 times the amount of RAM or 2 GB, whichever is smaller.

•If total physical RAM is equal to or more than 2 GB, the default size is set to 2 GB.

To create multiple paging files on one volume to overcome the 4,095-MB limit:

1.On the drive or volume you want to hold the paging files, create folders for the number of paging files you want to create on the volume. For example, C:\Pagefile1, C:\Pagefile2, and C:\Pagefile3.

2.Click Start, Click Run, type regedit in the Open box, and then click OK.

3.In the left pane, locate and click the following registry subkey:

HKEY_LOCAL_MACHINE\System\CurrentControlSet\Control\SessionManager\MemoryManagement

4.Find the Pagingfiles value, and then double-click it to open it.

5.Remove any existing values, and add the following values:

c:\pagefile1\pagefile.sys 3000 4000
c:\pagefile2\pagefile.sys 3000 4000
c:\pagefile3\Pagefile.sys 3000 4000

6.Click OK, and then quit Registry Editor.

7.Restart the computer to cause the changes to take effect.

8.Access the virtual memory settings to check the properties of the paging file. To do this, follow these steps.
Access the virtual memory settings on a Windows 2000-based computer

a. On the desktop, right-click My Computer, and then click Properties.

b. Click the Advanced tab.

c. Click Performance Options.

d. Click Change.

Access the virtual memory settings on a Windows XP-based or a Windows Server 2003-based computer

a. On the desktop, right-click My Computer, and then click Properties.

b. Click the Advanced tab.

c. Under Performance, click Settings.

d. Click the Advanced tab, and then click Change.

In this example, the initial size of the paging files is set to 3000. You could save disk space by setting the initial size of the extra paging files to 0 so that the space is used only if it is needed. The initial size of the paging file is initialized to the minimum size when the computer starts. If the initial size is 3000, that space is reserved on the disk regardless of whether it is being used.
Note To get a complete memory dump from computers that have 4 GB RAM or more, it is still necessary to use the /maxmem switch in the Boot.ini. One of the page files on the system partition must still be 1 MB larger than the amount of RAM installed in the computer to successfully create a memory dump.


APPLIES TO
  • Microsoft Windows Server 2003, Enterprise Edition for Itanium-based Systems
  • Microsoft Windows Server 2003, Enterprise Edition (32-bit x86)
  • Microsoft Windows Server 2003, Standard Edition (32-bit x86)
  • Microsoft Windows XP Professional x64 Edition
  • Microsoft Windows XP Professional
  • Microsoft Windows XP Home Edition
  • Microsoft Windows 2000 Datacenter Server
  • Microsoft Windows 2000 Advanced Server
  • Microsoft Windows 2000 Server
  • Microsoft Windows 2000 Professional Edition
Integrated ITS: installation and activation

The integrated ITS is part of the SAP Web Application Server 6.40. It is automatically installed together with the SAP kernel. To be able to use a service via the integrated ITS, you must first follow the standard procedures for activation and configuration of the Internet Communication Manager (ICM). For more information, see Administration of the Internet Communication Manager.

In addition, you must activate the service you want to execute and the service default_host/sap/public/bc/its/mimes in the Internet Communication Framework (ICF). For further information refer to Activating an SICF Service.

Make sure that besides the Internet service to be used also the two Internet services system and webgui (also known as SAP GUI for HTML) have been published to site INTERNAL, because objects of these services may also be used by other services.

The ICF path for the webgui service is /default_host/sap/bc/gui/sap/its/. You can use this path to search for the service in transaction SICF. HTTP requests with /sap/bc/gui/sap/its/webguispecified as path are forwarded to the request handler of the integrated ITS. The complete URL for access to the SAP system with SAP GUI for HTML is
http(s)://<icman-host>:<icman-port>/sap/bc/gui/sap/its/webgui

When using the integrated ITS, two profile parameters (see also Changing and Switching Profile Parameters) are of special importance:

● itsp/enable

You use this parameter to deactivate (0) or activate (1) the integrated ITS. Even if the integrated ITS is activated, it only accesses system resources when it is actually used. Nevertheless, it can make sense to deactivate it to prevent users from accessing the SAP system with SAP GUI for HTML via special application servers (such as batch or update instances). Since the conversion of SAP screens into HTML pages uses additional CPU time, it makes sense to reserve a number of dedicated application servers to be used with SAP GUI for HTML and to use a special logon group to balance the load between them.

● em/global_area_MB

The “global area“ is a memory shared by all work processes of the SAP kernel. The integrated ITS uses it for the runtime version of the HTML Business templates ("preparsed templates"). The memory required depends on the number and size of the templates used to display the services called by the users. The default value is large enough to use SAP GUI for HTML with one browser version in one logon language. If your users access the ITS with different languages or browsers (for example, Microsoft Internet Explorer and Netscape Navigator), or if they need additional services apart from SAP GUI for HTML, then the number of used templates will increase and you will have to adapt em/global_area_MB accordingly. You find information on when and how you should adapt this parameter in note 742048.

sabato 3 maggio 2008

upg Ora 817 to 920 WIN

30/04/2008
Restore di A1P su A1S alle WED, APR 30, 2008 01:20:00 AM
utenza produzione: gruppomm / ******
Dopo db copy: pulizia tabelle IACORDES IACORSITE TWPURLSVR - nota 313486 per la pubblicazione su ITS
All services, templates, and mimes have been overwritten by the current version of the component system. Therefore, you have to modify the service files of the bbpstart, bbpvendor, bbpwi services on the ITS server as described in SAP Note 0307782 <-- APPLICATA (A parte il logo, probabilmente modificato direttamente su file system, ITS e' ok)

Aggiornamento kernel alla versione 620 level 674 (nota 580772)

## Oracle Upg 02/05/2008 ##
estensione tablespace SYSTEM da 350 a 650 MB (AUTOEXTEND ON)
backup registry e 817 Ora sw - stop SAP e servizi relativi e servizi antivirus
passaggio US7ASCII --> WE8DEC (nota 102402)

installazione sw 920 nella nuova ORACLE_HOME (A1S920 - k:\oracle\A1S\920)

installazione del current patch set (9.2.0.8, nota 539921 e 578683)
CAUTION - >=9.2.0.7
Make sure that the _OPTIM_PEEK_USER_BINDS Oracle parameter is set to FALSE before you upgrade to Oracle 9.2.0.7 or higher. Otherwise, serious performance problems are very likely. See also the corresponding point in Note 176754.

installazione ultima fix disponibile con Opatch (K:\oracle\A1S\920\OPatch): 6867138
Per l'uso di Opatch e' stato necessario installare ActivePerl-5.10.0 ...
K:\6867138>C:\Perl\bin\perl K:\oracle\A1S\920\OPatch\opatch.pl apply
K:\6867138>C:\Perl\bin\perl K:\oracle\A1S\920\OPatch\opatch.pl lsInventory

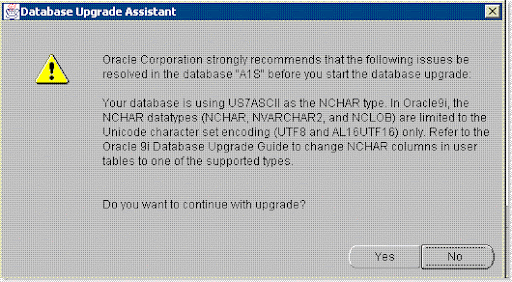
passaggio US7ASCII --> UTF8 (nota 669902)

 DUA_1

avvio servizi Ora (quello di A1S e i 2 listener) cancellazione ORACLE_HOME dal profilo di <sid>adm e lancio DUA
ATTENZIONE: prendere i listener.ora sqlnet.ora tnsnames.ora della 8.1.7 e copiarli sulla 9.20, modificare opportunamente i puntamenti interni per la ORACLE_HOME. La variabile PATH deve presentare entrambe le ORACLE_HOME (prima la 8.1.7 e poi la 9.20) - Prima di lanciare il DUA con <sid>adm modificare il file MEP.CFG situato in %ORACLE_HOME%\assistants\dbma della 920, sostituiendo la stringa <Datafile name ="{ORACLE_BASE}/oradata/{DB_NAME}/odma_rbs.dbf"/> con ad es. <Datafile name ="j:\oracle\DWP\odma_rbs.dbf"/>
ATTENZIONE 2: lanciare il DUA tramite PcAnywhere: con remote desktop si riceve comunque un "TNS protocol adapter error" ...
a fine procedura DUA, post-processing come da manuale, tra cui:
> variabili d'ambiente
> K:\usr\sap\A1S\sys\exe\run>sqlplus /nolog @sapdba_role A1S NT (Nota 134592)
> brtools (fatto girare lo script oradbusr.sql, il comando brconnect -u / -f check va a buon fine)